

Are you getting error the following error while you try to add a Google account to your Android device?
“Couldn’t Sign in
There was a problem communicating with Google servers.
Try again later.”
Some Android users get this issue when they tap on add account from the phone’s settings and some receive this error after entering all their Google account credentials. Sometimes just opening some Google services and apps also cause this error to appear.
When users encounter this error then they get annoyed. But now you don’t as this guide is going to provide all the potential solutions to fix “There was a problem communicating with Google server” on Android.
- Solution 1: Check Internet Connection
- Solution 2: Make Sure Date And Time Is Correct
- Solution 3: Switch To Another Network
- Solution 4: Update Your Android OS
- Solution 5: Remove And Re-add Google Account
- Solution 6: Turn Off Two-Step Verification
- Solution 7: Clear Google Services Cache And Data
- Solution 8: Reinstall Google Play Services
- Solution 9: Wipe Cache Partition
- Solution 10: Update Host File (Only For Rooted Device)
- Solution 11: Factory Reset Your Android Device
Now, we will check out a real user practical example.
Practical Example: A User Is Asking Help To Fix Error “There was a Problem Communicating with Google Server”
Hi everyone.
I’m in need of some help.
My Google Play store was not working so I deleted my Google account. Now I cannot add my Google account back.
It shows the message “There was a problem communicating with Google server”
And I’ve read each solution over the net. I’ve tried it all. My phone is not rooted and I don’t want to root it.
Can someone please help.. I really need this fixed. Bare in mind I tried everything.
Source: Android Forums
Why Is My Phone Saying “There Was A Problem Communicating With Google Servers”?
This error occurs due to a variety of reasons, some of the main reasons are listed below.
- Two-Step Verification: 2 step verification is a feature that prevents any other users from signing into your account. This feature stops other apps or devices from using your account. So, this can cause errors while making a connection using your Google account. This is also common when you add your Google account to other applications such as Outlook, these applications won’t add your Google account unless you add the apps from your account settings or you disable two-step verification. So, to fix it you need to disable two-step verification.
- Corrupted Cache: Each app stores temporary files so that it can open quickly. But sometimes these cache files get corrupted and cause apps and its feature to misbehave. To fix it you need to clear the cache of the apps.
- Host File: Host files are stored on your phone that has some importation phone configuration data. This error occurs due to the content of those files. In this situation, you need to change the contents of the host file to fix the issue.
Also Read: Google Calendar Not Syncing With Android? Here Is The Fix!
Solutions To Solve There Was A Problem Communicating With Google Servers
We have discussed the different solutions to fix this error. So, you need to try these solutions to get rid of this issue.
Note: All the below-mentioned solutions will be applicable for all Android phone brands such as Huawei, Samsung, LG, Xiaomi, OnePlus, Google Pixel, Realme, Oppo, Vivo, etc. as well as in all apps such as Play Store, Google Drive, Google Map, Gmail, Video Player app(s), Music Player app(s) and other apps, Android Emulator (Bluestacks, SmartGaGa, LDPlayer, MEmu, etc).
Video Guide: Fix There Was A Problem Communicating With Google Servers
Solution 1: Check Internet Connection
Poor internet connection might be the cause of this error on your device. Though this issue is network related therefore you should check your internet connection first.
You can check it by simply opening another application on your device. You can run a web browser search or try to send messages on WhatsApp to check the internet connection. If these applications can’t connect to the network then you can try the below tips to check the internet connectivity.
- If you are using a Wi-Fi network then you can restart your router. After this, restart your phone to see if this solves the problem.
- If you are using mobile data then you can enable Airplane mode for a few seconds and then disable it. After this, turn on your mobile data.
Solution 2: Make Sure Date And Time Is Correct
When you come across a server or network problem like the issue under-discussed, then you need to make sure that the date and time on your phone is correct. Otherwise, it can cause the expiration of the network certificate, which can provoke this issue.
So, simply follow the below steps to check the date and time on your Android phone.
Step 1: Go to Settings > System.
Step 2: Then tap on the Date & Time option.
Step 3: Now, tap on “Use network-provided time” and toggle it off.
Step 4: Next, tap on it again to choose “Use network-provided time”.

Now, try to use the Google apps or services to check if this solved the issue. If not, then try the next solutions.
Solution 3: Switch To Another Network
You can simply switch to another internet connection to solve the problem. For instance, if your device is connected to cellular data then you can disable it and switch to a Wi-Fi network or vice versa.
Here, follow the steps to proceed.
Step 1: Switch to another network (Wi-Fi or mobile data).
Step 2: Now, try to add your Google account.
Step 3: Switch back to the previous network and see if it resolves the Google server problem.
Solution 4: Update Your Android OS
Many users don’t take it seriously but updating the Android OS help to fix many issues. So, you should install the update to solve “there was a problem communicating with Google server” on Android.
To install the latest version of OS for your Android phone, go to Settings > About Phone > Check for an update. Tap on Download and Install button.
Solution 5: Remove And Re-add Google Account
You can simply log out of your Google account on your Android device and then add it again to get rid of Google server error.
So, below learn how to remove the Google account from your Android device.
Step 1: Launch the phone’s Settings app.
Step 2: Then scroll down and tap on Accounts and tap on it.
Step 3: Now, tap on REMOVE ACCOUNT to log out. You can also need to hit on 3 dots (depends on your Android version).
Step 4: Again, tap on REMOVE ACCOUNT to confirm the process.

Now, you can go ahead and add the Google account again by going to Settings > Accounts > Add account. Next, choose Google from the options. Now, confirm your password and then enter your Google account credentials on the upcoming screen.
Solution 6: Turn Off Two-Step Verification
If you have previously enabled two steps verification authentication password to protect your Google account, then it can conflict and interfere with Google server when you try to sign in to your account. So, if you have enabled it then now you need to disable it to solve the issue.
Here know how to disable two-step verification.
Step 1: On your phone, run the Settings app.
Step 2: Scroll down and tap on Google tab.
Step 3: Hit on Manage your Google Account.
Step 4: Then tap on 2-step verification under Security tab.

Step 5: Now, you will be redirected to your web browser. Again sign in to your Google account.
Step 6: Hit on Turn off to disable 2 steps verification.

Solution 7: Clear Google Services Cache And Data
If disabling the two-step verification didn’t help and the issue still persists then you can clear the cache and data of Google Play Services.
Below, follow the simple steps to clear cache and data of Google Play Services.
Step 1: Navigate to Settings > Apps & Notifications/Applications.
Step 2: Hit on “All apps” or “Manage apps”.
Step 3: Then hit on three dots at the top right corner of the screen and tap on Show system.
Step 4: Find Google Account Manager from the list of apps and open it.
Step 5: Now, tap on Storage & cache.
Step 6: Then tap on Clear cache and then on Clear data.
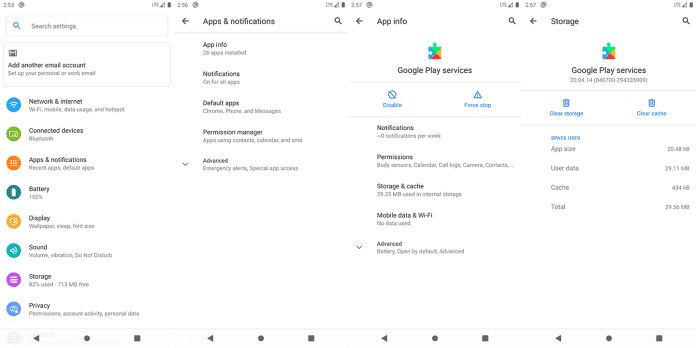
Now, you need to follow the same steps to clear cache and data of Google Services Framework, Google Play Services, Google Play Store, and Google One Time Init.
If you don’t find all these apps then clear the cache and data of available apps.
Also Read: How To Fix “Unfortunately, Google App has Stopped” Error on Android
Solution 8: Reinstall Google Play Services
If it continues to show the problem communicating with Google servers then you should consider reinstalling Google Play Services application.
Below learn the step to proceed.
Step 1: From your phone’s home screen touch the Settings app.
Step 2: Then hit on Apps & Notifications.
Step 3: After this, select Google Play Services from the app’s list.
Step 4: Next, hit on 3 dots on the top-right corner of the screen.
Step 5: Tap on Uninstall updates.
Step 6: When you are on that page, scroll down and hit on App details. This will help you to go to Google Play Store.
Step 7: Here, tap on Update to install the latest version of Google Play Services app.
Step 8: At last, restart your device when the update is completed. This will refresh the system.
Note: If you don’t find Google Play Services on your phone or Play Store, then download and install it from third-party sites such as uptodown.com or apkmirror.com
Solution 9: Wipe Cache Partition
Many users have reported that wiping the cache partition has helped to fix the issue. So, you can also try this to solve “there was a problem communicating with Google servers, try again later.” error on Android.
Below, learn the steps to do the same.
Step 1: First of all, search in Google to find out how to put your device into recovery mode for your phone model. For basic key combination to enter recovery mode on Android is mentioned – HERE
Step 2: Once your device successfully entered recovery mode, you will see options on the screen.
Step 3: Now, use the Volume key to highlight “wipe cache partition” option.

Step 4: Next, use the Power key to select it.
Step 5: Now, use Volume Down key to highlight yes, and use Power button to select it.
Step 6: Once the wipe cache partition is completed, Reboot the system now gets highlighted.
Step 7: Press the Power button to restart your Android phone.
Also Read: How To Solve “Firmware Upgrade Encountered An Issue” On Samsung
Solution 10: Update Host File (Only For Rooted Device)
If your phone is rooted then you can update the host file on your Android. But if your device is not rooted then you should not root your device as it will void the device warranty or even it can brick your device.
Here, follow the steps to update the host file.
Step 1: Firstly, you need to remove your Google account.
Step 2: Then download ES File Explorer and install it.
Step 3: Open the app and give all-important permissions.
Step 4: Open the side menu and turn on Root Explorer.
Step 5: If prompted then allow the Super User root request. (You will not get this if your phone is not rooted).
Step 6: Next, hit Local and from storage drives, choose Device.
Step 7: Here, hit on “System” folder and open the “etc” folder from there.
Step 8: Now, you need to find and tap on the “Host” file inside the folder.
Step 9: Next, from the list choose ES Note Editor.
Step 10: Inside the editor, clear the existing texts from the host’s file and enter “0.0.1 localhost”.
Step 11: Save the file and then close the editor.
Step 12: Now, you can again log in to your Google account.
Solution 11: Factory Reset Your Android Device
If still the issue persist then lastly you need to factory reset your phone. Make sure you have created a backup of all important data as it will wipe all your device data.
Now, below follow the simple steps to factory reset Android phone.
Step 1: Go Settings > Backup & Reset.
Step 2: Then hit on Factory data reset.
Step 3: Hit Reset Device.
Step 4: Finally, tap on Erase Everything.
Wrap Up
Now you can goodbye to the error there was a problem communicating with Google servers on Android phone by using the solutions that I have mentioned above. I hope by following any one solution will surely help you to solve this issue.
Please support us by subscribing to our YouTube Channel.
Please share this post, if you have found this post helpful. As it can help others to fix the error.

Max Field is a founder of Recover Android Data. He is an Android lover and loves to write tips, tricks, fixes for errors, data recovery solutions and more related to Android. Provide Gaming Tips, Tricks, Game Error/Issues Solutions (PC/Xbox/PlayStation/Mobile). He has 11+ years of experience in this field.